Sheet Pan Pumpkin Pie (gluten-free and vegan)
This post may contain affiliate links. As an Amazon Associate and an affiliate for other programs, I earn a commission from qualifying purchases. Read the disclosure policy for more information.
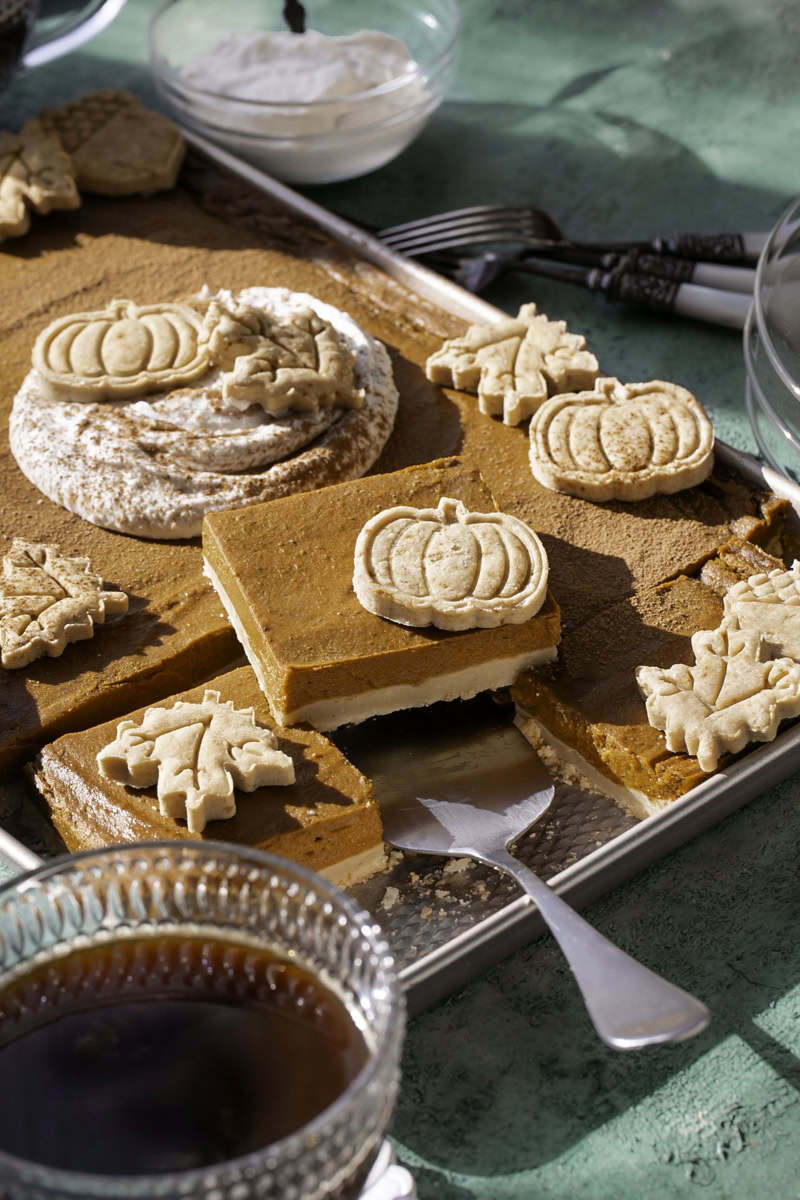
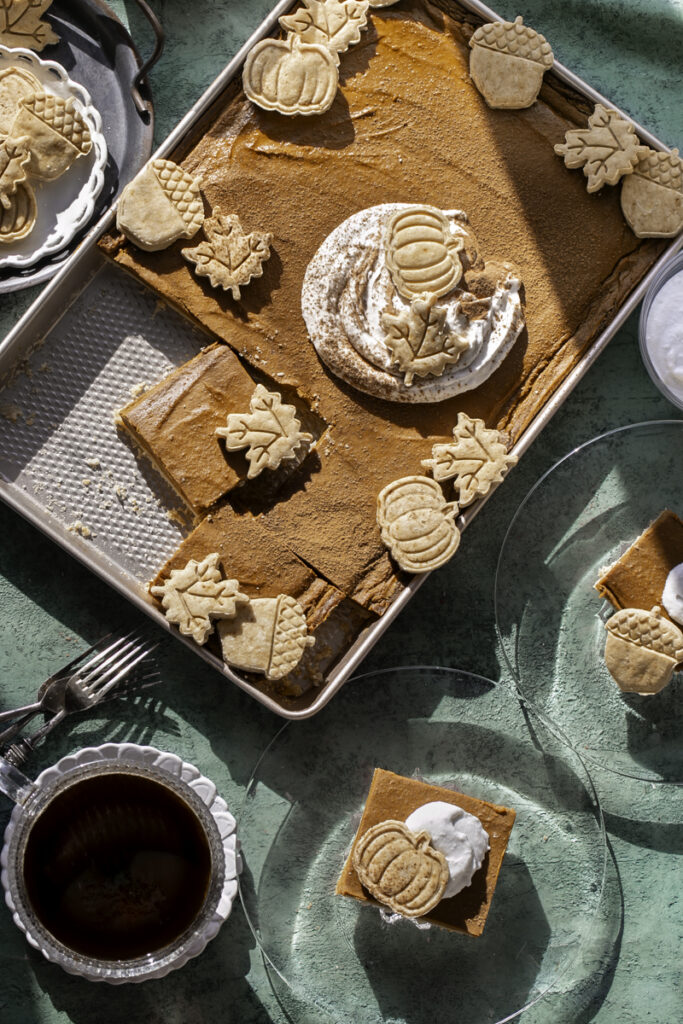
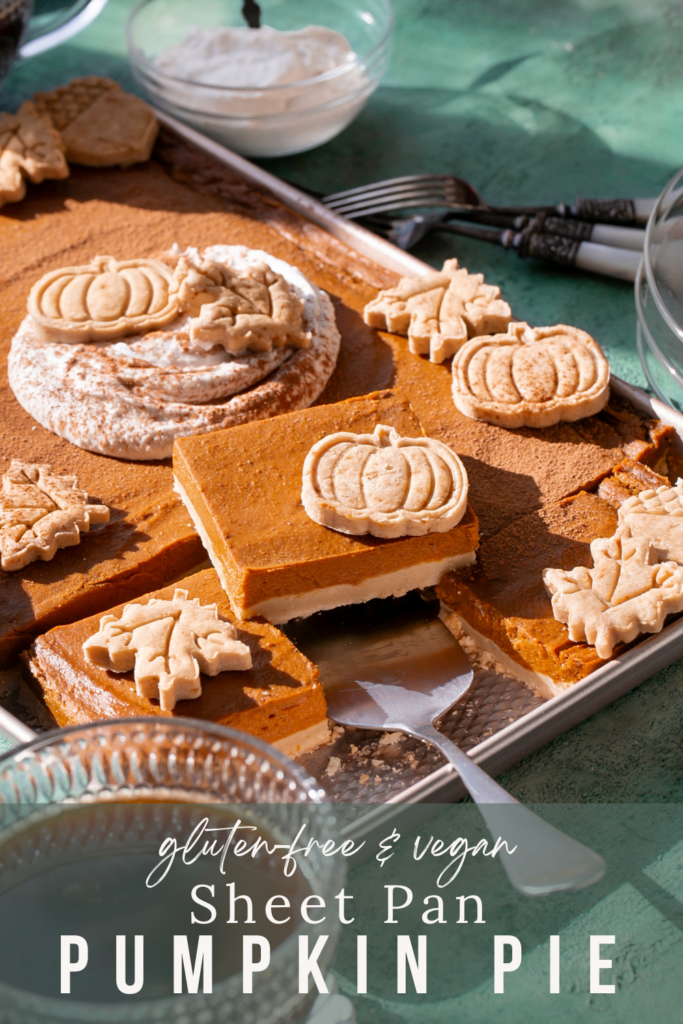
This clever Sheet Pan Pumpkin Pie hack gives you more of the Thanksgiving pumpkin pie fun while saving time and effort on a traditional Thanksgiving dessert. This gluten-free, vegan, perfectly spiced pumpkin slab pie is perfect to feed a crowd on Thanksgiving Day!
November is gluten-free awareness month. Gluten-Free Awareness Month recognizes the challenges gluten can create in a diet, and the diseases that can be linked to gluten. This can be especially difficult around the holidays… for those who might not be able to enjoy traditional Thanksgiving foods and also to those who try to accommodate those of us with gluten-related issues. With the growing availability of gluten-free food items, it’s easier than ever to be inclusive to family and friends who can’t consume gluten, and this Sheet Pan Pumpkin Pie is a prime example of everyone coming together to enjoy the same dessert. Seriously though, those with and without food sensitivities will LOVE this pumpkin pie!
Why a Sheet Pan Pie (aka Slab Pie)?
Well, there’s a number of reasons why I’m the newest fan of pies made in a sheet pan.
1. It’s wayyyyy easier than a traditional pie when you’re working with gluten-free pie crust. It’s no secret that gluten-free dough is crumbly. When you make a sheet pan pie, you just simply press the pie dough into the sheet pan and you’re done. No rolling, no fluting the edges 😅.
2. It feeds more people. Sean pies are great for feeding a crowd. No more making two pies, just make one sheet pan pie and boom👏🏻 done. And if you just so happen to be feeding a small crowd, you’ll have leftover pie, which- who doesn’t like leftover pie?! It’s a win in my book.
3. Portion control… if you’re into that, haha. The pieces of pie are smaller, so you don’t overindulge, or if you feel like it- just have two pieces! No one’s judging 😜.
4. I find the crust to pumpkin pie filling ratio is much better in a slab pie!
Should I go on?!

The Gluten-Free Crust
This gluten-free pie crust turned out better than I expected! It’s made with just a few simple ingredients and is so easy to prepare, because remember there’s no rolling or fluting the pie crust into a pie plate. It’s just press and bake!
Almond flour. For this recipe I used blanched super fine almond flour. You will need 3 cups for the crust and if you’re making the cutouts you will need an additional 1/2 cup. The almond flour helps give the pie crust a soft texture! I used Kroger Simple Truth brand for this recipe.
Gluten-free all purpose flour. I find adding 1 cup of gluten-free all purpose flour helps hold the crust together a bit more while also keeping it soft. I used Kroger Simple Truth brand.
Salt. Just a teaspoon of salt is needed in the crust. I like to use pink Himalayan salt for a milder taste.
Vegan butter. My favorite plant-based stick butter for baking is Miyoko’s European Style butter block. You will need 1 cup (1 full block) for the crust. You will need an additional 1/4 cup for the crust cutouts if making.
Coconut oil. 1/4 cup of softened coconut oil helps to make the pie crust soft and flaky, kind of like how using crisco or vegetable shortening would act, except a lot healthier.
You’ll want to make this pie in a 15×10 jelly roll pan, it’s the perfect size for this sheet pan pumpkin pie.
To make the pie crust whisk together the flours and salt, then cut in the butter and coconut oil and knead gently until a dough forms. Press the dough into a 15×10 jelly roll pan. The crust is just enough to cover the bottom of the pan, so if you want crust up the sides you can double the recipe or make the pie crust cut outs like I did. Poke holes in the crust and bake the crust for 5 minutes then remove from the oven.

The Pumpkin Filling
The filling is also easy to make! Here’s what you need:
Pumpkin puree. Make sure you use PURE pumpkin puree AND NOT PUMPKIN PIE MIX!!! You will need two cans.
Coconut milk. Using coconut milk helps to make the filling creamy while also helping the pie set up correctly after it’s chilled. You will need 2 cans, and you’ll only want to use the solid white part only. To help the coconut milk separate the solid white from the liquid, I place my coconut milk in the fridge the evening before I’m planning to make this pie.
Tapioca flour/starch. Helps to sturdy the filling since we aren’t using eggs. You need 1/2 cup.
Coconut sugar. To keep this pie refined sugar free, I’m using coconut sugar! It compliments the pumpkin so well and gives this pumpkin pie just the right amount of sweetness. You will need one and a half cups, plus two additional tablespoons if you’re making the crust cookie cutouts.
Pumpkin pie spice. For this pumpkin pie I used premixed pumpkin pie spice. I like the one from Spice Islands because it already has all the spices included, but you may also use any pumpkin pie spice you like or can find. You can always make your own at home as well. This recipe calls for 3 teaspoons of pumpkin pie spice and it was perfectly spiced.
Cinnamon. I love, love, love cinnamon so I added an additional teaspoon to the filling. There is cinnamon in my pumpkin pie spice, but I always just add more. If you’re pumpkin pie spice doesn’t contain cinnamon, you may want to consider adding 2 teaspoons 😉
Vanilla. You’ll need 2 teaspoons of PURE vanilla extract in the pie filling (NOT imitation vanilla).
To make the filling, add all of the filling ingredients to a food processor or blender and blend until smooth. Spread the filling over the crust. This filling isn’t as runny as pumpkin pie you might be used to because there’s no eggs. Be rest assured, this filling bakes up perfectly and is the perfect pumpkin pie texture 👌🏻.
Bake the pie for 30-35 minutes. Allow the pie to cool on a wire rack to room temperature and then place in the refrigerator uncovered to chill overnight.
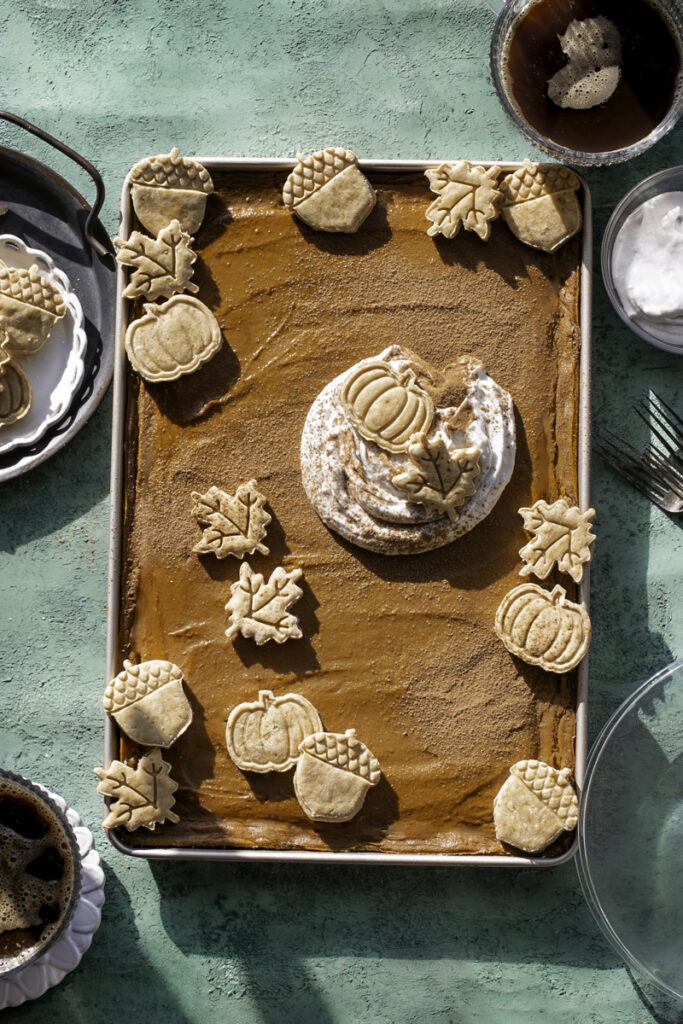
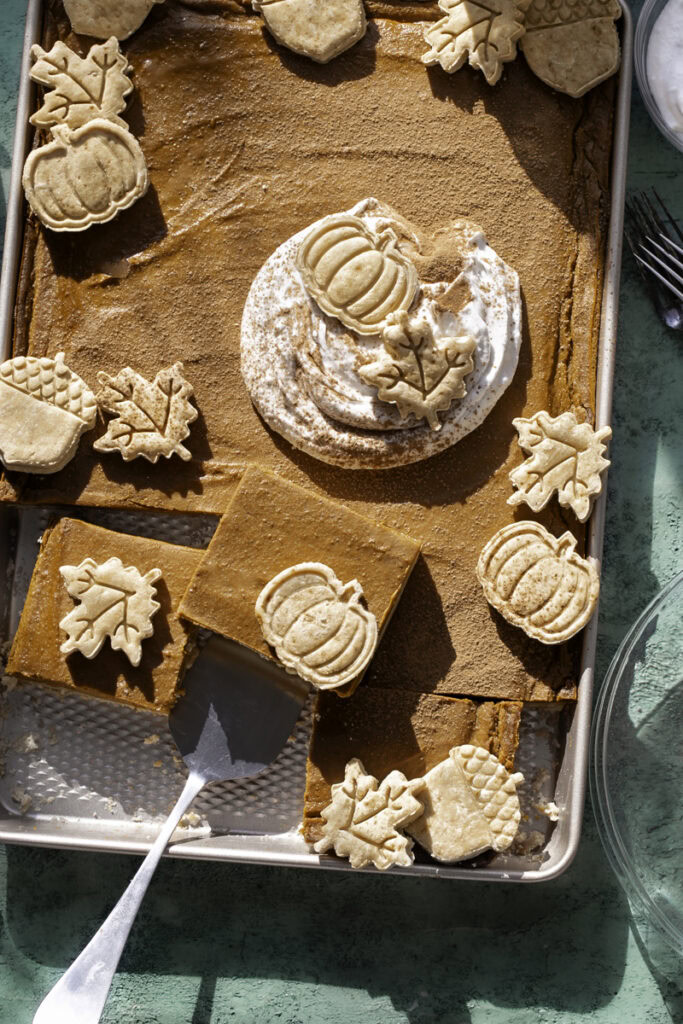
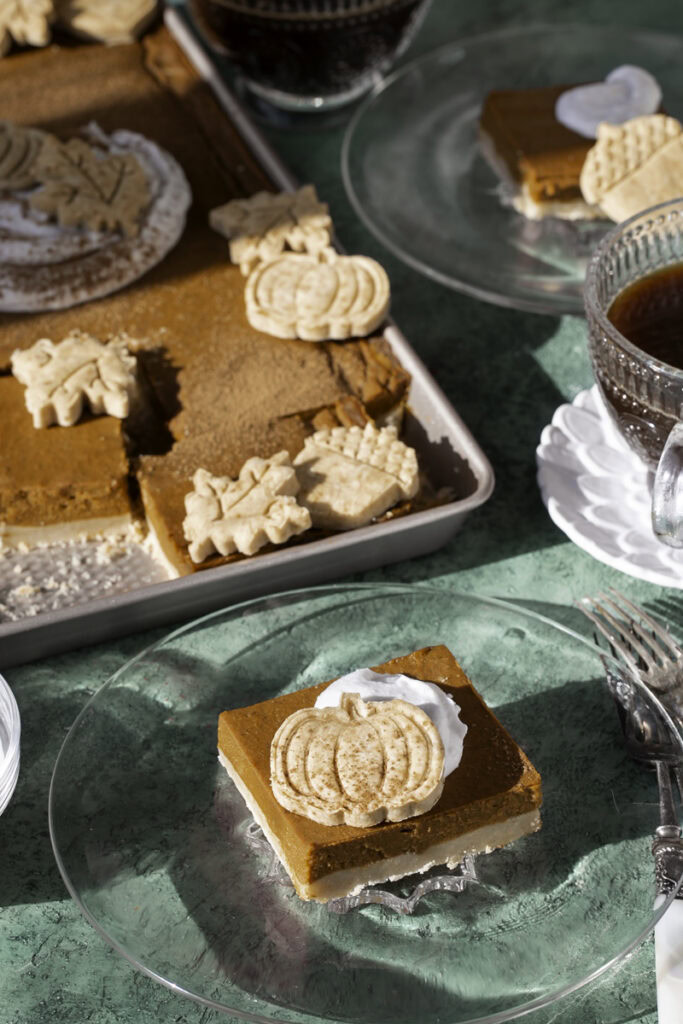
The Pie Crust Cutouts
These cute little pie crust cutouts are completely optional, but if you’re a crust lover, you might want to make these real quick… and they look adorable!
If making, whisk the flours and coconut sugar together, cut in the butter and the ice cold water to form the dough. Roll out the dough and use whatever cookie cutter shapes you’d like. Use the plant milk or vegan butter as an “egg wash” and brush over the shapes then bake in the oven for 15 minutes (they likely won’t brown too much so don’t overbake). Top the pie how you’d like or serve one cut out per piece of pie as you serve! Serve with dairy-free whipped cream if desired.

Let me know what you think about this Sheet Pan Pumpkin Pie down below in the comments section, as well as giving it a five rating ⭐️⭐️⭐️⭐️⭐️ so that others can discover this easy, gluten-free, vegan pumpkin pie recipe! Tag me on Instagram, Facebook, or Pinterest if you make it!

Sheet Pan Pumpkin Pie (gluten-free and vegan)
- Total Time: 25 hours
- Yield: 12–15 people 1x
Description
This clever Sheet Pan Pumpkin Pie hack gives you more of the Thanksgiving pumpkin pie fun while saving time and effort on a traditional Thanksgiving dessert. This gluten-free, vegan, perfectly spiced pumpkin slab pie is perfect to feed a crowd on Thanksgiving Day!
Ingredients
Crust
- 3 cups blanched almond meal/flour
- 1 cup gluten-free all purpose flour
- 1 teaspoon salt
- 1 stick (1 cup) vegan butter
- 1/4 cup coconut oil, softened but not completely melted
Filling
- 2 cans (30 oz) pure pumpkin puree
- 2 cups coconut milk, solid part only from 2 cans of coconut milk (helps to chill the can overnight to separate the solid from the liquid)
- 1 1/2 cups coconut sugar
- 1/2 cup tapioca flour
- 3 teaspoons pumpkin pie spice
- 1 teaspoon cinnamon
- 2 teaspoons pure vanilla extract
Pie Crust Cut Outs (optional)
- 1 1/2 cups gluten-free all purpose flour
- 1/2 cup blanched almond meal/flour
- 2 tablespoons coconut sugar
- 1/4 cup vegan butter
- 6–7 tablespoons ice cold water
- Plant milk or butter used as a wash over the cutouts (optional)
Instructions
Preheat the oven to 350 degrees F. To make the pie crust whisk together the flours and salt, then cut in the butter and coconut oil and knead gently until a dough forms. Press the dough into a 15×10 jelly roll pan. The crust is just enough to cover the bottom of the pan, so if you want crust up the sides you can double the recipe or make the pie crust cut outs like I did. Poke holes in the crust and bake the crust for 5 minutes then remove from the oven.
To make the filling, add all of the filling ingredients to a food processor or blender and blend until smooth. Spread the filling over the crust. Bake the pie for 30-35 minutes. Allow the pie to cool on a wire rack to room temperature and then place in the refrigerator uncovered to chill overnight.
If making the pie crust cut outs, whisk the flours and coconut sugar together, cut in the butter and the ice cold water to form the dough. Roll out the dough and use whatever cookie cutter shapes you’d like. Use the plant milk or vegan butter as an “egg wash” and brush over the shapes then bake in the oven for 15 minutes (they likely won’t brown too much so don’t overbake). Top the pie how you’d like or serve one cut out per piece of pie as you serve! Serve with dairy-free whipped cream if desired.
- Prep Time: 30 minutes
- Additional Time: 24 hours
- Cook Time: 30 minutes
- Category: Thanksgiving
- Cuisine: American

Substitute for GF AP flour, vegan butter ?
Also would this work in a 9×13 do you think ?
You could use a gf baking flour or another gluten free flour of choice- but I have not tried to make this pie with any other flours so I cannot guarantee the same results. If you’d like to use all coconut oil instead of vegan butter you can try that- again, I haven’t tried it so not sure that would work. It could potentially work in a 9×13- the crust will come out thicker probably. You can also try a baking sheet.