Description
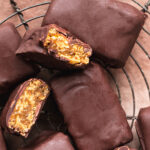
It's so easy to make your own Butterfinger Bars at home! These Healthier Vegan Butterfinger Bars are a healthier alternative to one of the most popular candy bars using corn flakes, sunflower seed butter to keep them nut-free, vanilla, molasses, agave syrup, and dairy-free chocolate chips. There is NO CANDY CORN in this recipe to keep this butterfinger candy naturally sweetened and corn syrup free!
Ingredients
Units
Scale
- 2.5 cups corn flake cereal (make sure to use a healthier option that doesn't have a ton of added sugar or malt flavoring as that could be derived from barley and is NOT gluten-free)
- 1 cup unsweetened sunflower seed butter
- 1/2 cup agave syrup
- 1 tablespoon molasses
- 1 teaspoon pure vanilla extract
- 1/2 teaspoon salt
- 1 teaspoon turmeric powder (for color), optional
- 10 ounces semi-sweet/dark dairy-free chocolate chips
- 2 teaspoons coconut oil
Instructions
- First, crush the corn flakes in a gallon bag using a measuring cup or bowl, even a spoon or your hands. You want the pieces pretty small. Alternatively you can pulse them in a food processor or blender.
- Next, whisk together the sunflower seed butter, agave syrup, molasses, pure vanilla extract, salt, and turmeric powder (if using) in a large bowl until smooth. Fold in the cornflakes until they are well coated.
- Spoon the mixture into an 8×8 parchment-lined baking pan and place in the freezer for 2 hours to overnight. Then slice into bars, squares… whatever shape you'd like and place them back into the freezer.
- Melt the chocolate chips with coconut oil in the microwave in 30 second intervals until fully melted. Mine took about 1 minute 30 seconds. Stir in between heating times because the chocolate chips will melt as stirred. You don't want to cook the chocolate chips or they won't be that melty chocolate we want.
- Working quickly, remove the sliced bars from the freezer and coat completely in the melted chocolate. If they become too soft and start to break, place them back in the freezer and remove one bar from the freezer at a time coating them in chocolate. Let the excess chocolate drip off and place on a parchment-lined baking sheet. Repeat until all the bars are coated.
- Place the bars back into the freezer for about 20-30 minutes to set up completely and enjoy! You can cut excess chocolate off the bars if desired. It's best to keep these bars stored covered in the fridge or freezer as they will soften when at room temperature, and the whole reason why we love butterfinger bars so much is because of that crunch!
- Prep Time: 3 hours
- Additional Time: 0 hours
- Cook Time: 0 hours
- Category: Dessert
- Cuisine: American